-
Table of Contents
- Introduction
- Step-by-Step Guide to Adjusting the Valves on a Mini Cooper
- Common Problems to Look Out for When Adjusting the Valves on a Mini Cooper
- How to Diagnose a Faulty Valve Adjustment on a Mini Cooper
- The Benefits of Regularly Adjusting the Valves on a Mini Cooper
- How to Save Money by Adjusting the Valves on a Mini Cooper Yourself
- Q&A
- Conclusion
Introduction
Adjusting the valves on a Mini Cooper is an important part of regular maintenance that should be done every 30,000 miles. It is a relatively simple process that can be done in a few hours with the right tools and knowledge. This guide will provide step-by-step instructions on how to adjust the valves on a Mini Cooper. It will also provide tips on how to make the process easier and more efficient.
Step-by-Step Guide to Adjusting the Valves on a Mini Cooper
Adjusting the valves on a Mini Cooper is an important part of regular maintenance. It is recommended that the valves be adjusted every 30,000 miles or so. This guide will provide step-by-step instructions on how to adjust the valves on a Mini Cooper.
Step 1: Disconnect the Battery
Before beginning any work on the Mini Cooper, it is important to disconnect the battery. This will prevent any electrical shocks or damage to the vehicle.
Step 2: Remove the Valve Cover
The valve cover is located on the top of the engine. It is held in place by several bolts. Use a socket wrench to remove the bolts and then carefully lift off the valve cover.
Step 3: Inspect the Valves
Once the valve cover is removed, inspect the valves for any signs of wear or damage. If any of the valves are damaged, they should be replaced before continuing.
Step 4: Adjust the Valves
Using a feeler gauge, adjust the valves to the manufacturer’s specifications. This can be found in the owner’s manual or online.
Step 5: Reinstall the Valve Cover
Once the valves have been adjusted, reinstall the valve cover. Make sure to use the same bolts that were removed.
Step 6: Reconnect the Battery
Finally, reconnect the battery and start the engine. The Mini Cooper should now be running smoothly.
Following these steps will ensure that the valves on a Mini Cooper are properly adjusted. Regular maintenance is essential for keeping the vehicle running smoothly and efficiently.
Common Problems to Look Out for When Adjusting the Valves on a Mini Cooper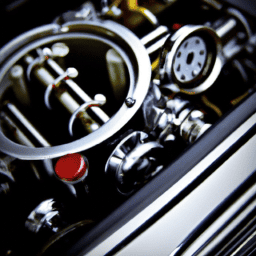
When adjusting the valves on a Mini Cooper, it is important to be aware of some common problems that may arise.
First, it is important to ensure that the valve clearances are set correctly. If the clearances are too tight, the valves may not open and close properly, resulting in poor engine performance. If the clearances are too loose, the valves may not close completely, resulting in a loss of compression and power.
Second, it is important to check the condition of the valve springs. If the springs are worn or damaged, they may not be able to keep the valves closed properly, resulting in a loss of compression and power.
Third, it is important to check the condition of the valve seals. If the seals are worn or damaged, they may not be able to keep the valves sealed properly, resulting in a loss of compression and power.
Fourth, it is important to check the condition of the valve guides. If the guides are worn or damaged, they may not be able to keep the valves in the correct position, resulting in poor engine performance.
Finally, it is important to check the condition of the valve seats. If the seats are worn or damaged, they may not be able to keep the valves in the correct position, resulting in poor engine performance.
By being aware of these common problems, it is possible to ensure that the valves on a Mini Cooper are adjusted correctly and that the engine performs optimally.
How to Diagnose a Faulty Valve Adjustment on a Mini Cooper
Valve adjustment is an important part of regular maintenance for a Mini Cooper. If the valves are not adjusted properly, it can lead to poor engine performance and even engine damage. To diagnose a faulty valve adjustment on a Mini Cooper, there are a few steps that should be taken.
First, check the engine oil level. If the oil level is low, it could indicate that the valves are not adjusted properly. If the oil level is low, it is important to add oil and then recheck the valve adjustment.
Second, check the spark plugs. If the spark plugs are fouled or worn, it could indicate that the valves are not adjusted properly. If the spark plugs are fouled or worn, it is important to replace them and then recheck the valve adjustment.
Third, check the exhaust system. If the exhaust system is producing excessive smoke or noise, it could indicate that the valves are not adjusted properly. If the exhaust system is producing excessive smoke or noise, it is important to inspect the system and then recheck the valve adjustment.
Fourth, check the engine compression. If the engine compression is low, it could indicate that the valves are not adjusted properly. If the engine compression is low, it is important to inspect the valves and then recheck the valve adjustment.
Finally, check the engine idle. If the engine idle is rough or erratic, it could indicate that the valves are not adjusted properly. If the engine idle is rough or erratic, it is important to inspect the valves and then recheck the valve adjustment.
If any of these steps indicate that the valves are not adjusted properly, it is important to have a qualified mechanic adjust the valves. This will ensure that the engine is running properly and will help to prevent further damage.
The Benefits of Regularly Adjusting the Valves on a Mini Cooper
Regularly adjusting the valves on a Mini Cooper is an important part of maintaining the vehicle. This process helps to ensure that the engine runs smoothly and efficiently, and can help to extend the life of the vehicle. Here are some of the benefits of regularly adjusting the valves on a Mini Cooper:
1. Improved Performance: Adjusting the valves on a Mini Cooper helps to ensure that the engine is running at its optimal performance level. This can help to improve the vehicle’s acceleration, fuel economy, and overall performance.
2. Reduced Emissions: Regularly adjusting the valves on a Mini Cooper can help to reduce emissions from the vehicle. This is because the engine is running more efficiently, which means that it is producing fewer pollutants.
3. Extended Engine Life: Adjusting the valves on a Mini Cooper helps to ensure that the engine is running at its peak performance level. This can help to extend the life of the engine, as it is not being overworked or strained.
4. Reduced Maintenance Costs: Regularly adjusting the valves on a Mini Cooper can help to reduce the amount of maintenance that is required for the vehicle. This can help to save money in the long run, as fewer repairs and replacements will be needed.
Overall, regularly adjusting the valves on a Mini Cooper is an important part of maintaining the vehicle. This process can help to improve the performance of the vehicle, reduce emissions, extend the life of the engine, and reduce maintenance costs. Therefore, it is important to ensure that the valves on a Mini Cooper are adjusted regularly.
How to Save Money by Adjusting the Valves on a Mini Cooper Yourself
Maintaining your Mini Cooper is essential for keeping it running smoothly and efficiently. One of the most important maintenance tasks is adjusting the valves. This is a relatively simple process that can be done at home, saving you money on labor costs.
Before you begin, make sure you have the necessary tools and supplies. You will need a valve adjustment tool, a torque wrench, a feeler gauge, and a can of engine oil. You will also need a clean rag and a container to catch any oil that may drip.
Once you have all the necessary supplies, you can begin the process. Start by removing the valve cover. This will give you access to the valves. Use the valve adjustment tool to adjust the valves. Make sure to follow the manufacturer’s instructions for the specific model of your Mini Cooper.
Next, use the feeler gauge to measure the gap between the valve stem and the rocker arm. Adjust the gap to the manufacturer’s specifications. Once the gap is set, use the torque wrench to tighten the valve cover bolts.
Finally, add a few drops of engine oil to the valve cover and replace it. Make sure to tighten the bolts securely.
By following these steps, you can save money by adjusting the valves on your Mini Cooper yourself. This simple process will help keep your car running smoothly and efficiently.
Q&A
1. What tools do I need to adjust the valves on a Mini Cooper?
You will need a 10mm socket, a ratchet, a feeler gauge, and a torque wrench.
2. How often should I adjust the valves on my Mini Cooper?
It is recommended to adjust the valves on your Mini Cooper every 30,000 miles or every two years, whichever comes first.
3. What is the procedure for adjusting the valves on a Mini Cooper?
The procedure for adjusting the valves on a Mini Cooper involves removing the valve cover, inspecting the valve clearances, adjusting the clearances as necessary, and then re-installing the valve cover.
4. What is the correct valve clearance for a Mini Cooper?
The correct valve clearance for a Mini Cooper is 0.006 inches for the intake valves and 0.008 inches for the exhaust valves.
5. What can happen if the valve clearance is not adjusted correctly?
If the valve clearance is not adjusted correctly, it can cause the engine to run poorly, have reduced power, and even cause damage to the engine.
Conclusion
Adjusting the valves on a Mini Cooper is a relatively simple process that can be done with basic tools and a bit of patience. It is important to ensure that the valve clearances are set correctly to ensure the engine runs smoothly and efficiently. If done correctly, adjusting the valves on a Mini Cooper can help to improve the performance and longevity of the engine.
