To remove an alternator from a Mini Cooper, first make sure safety by disconnecting the battery, ideally starting with the negative terminal. Next, gain access to the alternator by disconnecting electrical connectors, removing Torx T25 fasteners, and taking out the skid plate. You'll also need to unfasten subframe bolts, pull the bumper forward, and disconnect the air charge tube. Once you've done this, release the tension from the belt and unscrew the mounting bolts to free the alternator. Maneuver it carefully to avoid damage. Proper alignment and careful handling are essential for a successful removal. Following these steps will guide you through a thorough process, ensuring a smooth procedure ahead.
Safety Precautions
Before attempting to remove the alternator from your Mini Cooper, you must first disconnect the battery to mitigate the risk of electrical accidents. This initial step is essential for creating a safe working environment and preventing any unexpected power surges that could cause harm. Additionally, wearing appropriate safety gear can't be overstated. Donning gloves and eye protection is vital to shield yourself from potential hazards like sharp edges, flying debris, or chemical splashes that can occur during the removal process.
Ensuring that your vehicle is parked on a flat, stable surface further enhances your safety and the effectiveness of your work. An uneven or unstable surface can introduce unnecessary risks, potentially shifting the vehicle during the operation. It's also imperative to use the proper tools and equipment specified for the job. Utilizing the correct size wrenches and sockets not only prevents damage to the alternator and surrounding components but also minimizes the chance of personal injury.
Adhering to the manufacturer's guidelines and the service manual's instructions for alternator removal ensures that you're executing the procedure correctly. These guidelines are designed to provide you with the safest and most efficient method of removing the alternator, considering the unique specifications of your Mini Cooper.
Disconnecting the Battery
As you prepare to remove your Mini Cooper's alternator, the first critical step involves disconnecting the battery to prevent electrical shocks and safeguard the vehicle's electrical system. This foundational act guarantees your safety and the integrity of the Mini Cooper's intricate electrical system during the alternator removal process.
To start, focus on disconnecting the negative terminal first. This is paramount to prevent the risk of creating a short circuit that could cause damage or injury. Use a suitable wrench to loosen the nut on the negative terminal; then, carefully lift the cable off the terminal. Once removed, it's essential to isolate this cable to ensure it doesn't accidentally come into contact with the battery again. You might want to secure it away from the battery with a non-conductive material, ensuring it stays put during the entire operation.
Employing the correct tools and taking these precautions are non-negotiable steps in effectively disconnecting the battery. This preventive measure not only protects you from electrical shocks but also guarantees the electrical system remains unharmed, ready for the successful removal and replacement of the alternator. Remember, a careful approach to disconnecting the battery sets the stage for a smooth and safe repair process.
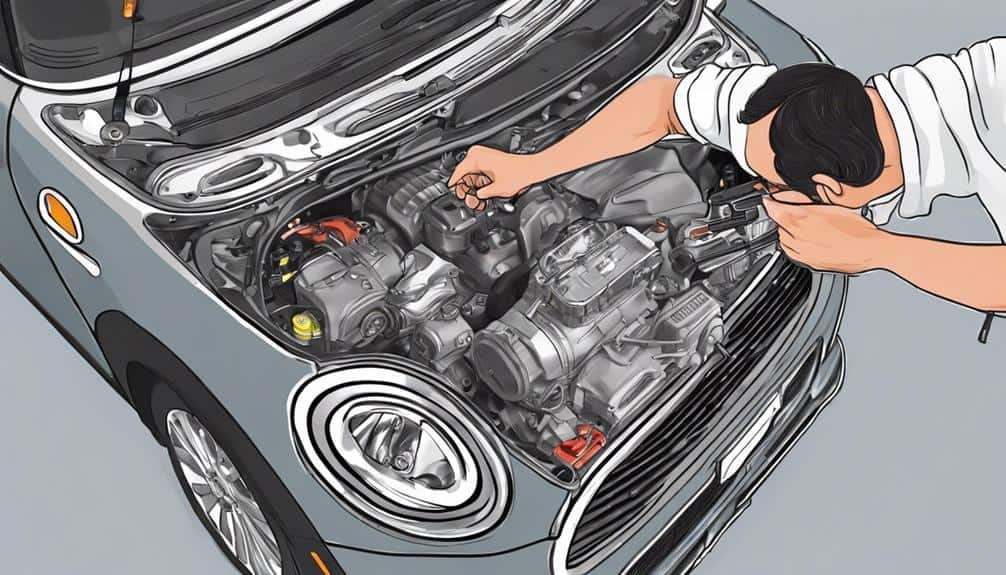
Accessing the Alternator
To access the alternator in your Mini Cooper, you'll first need to prepare the engine bay by disconnecting the charge tube for coolant.
Next, you'll use a special tool to release the tension from the belt, making it easier to remove from the alternator.
Engine Bay Preparation
Begin your engine bay preparation by disconnecting electrical connectors and removing the six Torx T25 fasteners to detach the front bumper, ensuring clear access to the alternator. Next, take out the skid plate and unfasten the subframe bolts. This step is important for creating the necessary space to access the alternator comfortably.
| Step | Purpose |
|---|---|
| Remove front bumper | Reveals alternator and electrical connector |
| Disconnect charge tube | Prevents coolant leakage |
| Release belt tension | Eases alternator pulley access |
| Move AC line | Clears path for alternator removal |
| Unfasten subframe bolts | Increases work area around the alternator |
Pull the bumper forward, and if your model has a turbo, remember to disconnect the air charge tube as well. This preparation ensures you're ready to tackle the alternator removal without hindrance.
Component Disconnection Steps
First, make certain the Mini Cooper's engine is cool before you disconnect the battery, an important step in safely accessing the alternator for removal or replacement.
You'll need to disconnect the charge tube for coolant to reach the alternator. Use a special tool to release tension from the belt before removing it. Carefully detach the belt from the alternator, setting it aside.
Proceed to disconnect the electrical connectors and unbolt the alternator from its mount. With the old alternator removed, it's time to install the new alternator. Make sure it's securely in place, reattach the electrical connectors, and bolt it down.
Removing the Alternator
You'll need to start by preparing your Mini Cooper for the alternator removal, which includes disconnecting the battery and any relevant coolant tubes.
Next, you'll follow a series of steps to remove the alternator, involving releasing tension from the belt, disconnecting electrical connectors, and unscrewing the mounting bolts.
After the alternator is out, it's important to run through a post-removal checklist to make sure everything is set for installing a new alternator.
Preparing the Mini Cooper
Disconnect the charge tube for coolant and utilize a special tool to release tension from the belt before attempting to remove the alternator from your MINI Cooper Hatchback. Preparing your vehicle properly is important for a smooth process.
Here's a concise guide:
- Disconnect Electrical Connectors: Gently unplug all electrical connectors linked to the alternator, ensuring you don't tug or damage the wires.
- Handle the AC Line Carefully: In turbo models, the AC line is particularly vulnerable. Maneuver it with care to prevent any damage that could complicate the removal process.
- Mind the Alternator's Positioning: When extracting the alternator, watch its orientation to avoid any contact with the AC system or the risk of hitting the fender with the front end ears.
Alternator Removal Steps
After preparing your Mini Cooper by disconnecting necessary components and ensuring the vehicle is safely secured, it's time to focus on the actual removal of the alternator.
First, disconnect the charge tube for coolant to prevent any spillage. You'll need a special tool to release tension from the belt, allowing for its removal without strain.
Next, carefully disconnect the electrical connectors that power the alternator. Pay attention as you remove the two Torx bolts that secure the alternator in place; these bolts are vital for the alternator's stability.
Carefully maneuver the alternator out, ensuring you avoid any damage to the AC system. It's important to maintain proper alignment during this process to prevent any complications.
Post-Removal Checklist
Once the alternator is removed, make sure all electrical connections have been disconnected and the securing bolts fully removed before proceeding. Here's a concise checklist to confirm everything is in order post-removal:
- Inspect the Engine Compartment: Carefully check around the engine compartment for any components that might still need to be removed or adjusted. This includes looking for any obstacles that could hinder the removal of the belt from the front of the car.
- Remove the Belt: If you haven't already, make certain you remove the belt completely. It's important for preventing any potential damage when reinstalling the alternator or other components.
- Secure the Alternator: Place the removed alternator in a safe location to avoid any damage. Ensure it's on a stable surface away from any potential hazards in your workspace.
Installation Tips
To guarantee a smooth operation and longevity of your Mini Cooper's alternator, start by securely mounting it to the engine block. This step is vital to prevent any movement or damage during operation. Make sure that the alternator is positioned correctly and that each bolt is tightened to the manufacturer's recommended specifications. This secure mounting provides a stable foundation for the alternator, reducing the risk of mechanical failures.
Next, reattach all electrical connections to the alternator, paying close attention to applying the proper torque. This includes the 12v lead wire bolt, which should be tightened to the specified torque to ensure a secure electrical connection without over-tightening. A reliable electrical system is fundamental for your Mini Cooper's performance, and proper torque prevents loose connections that could lead to electrical failures.
Properly tension the serpentine belt to prevent slippage and ensure efficient power transfer from the engine to the alternator. Slippage can lead to inefficiencies and potential damage, so correct tension is key.
Lastly, verify the correct installation of spacer bushings, if applicable. These bushings are essential for maintaining proper alignment and functionality of the alternator, ensuring it operates smoothly without undue stress or misalignment.
Reassembly Steps
How do you guarantee a smooth reassembly process for your Mini Cooper's alternator? Begin by securing the alternator in place with bolts for operational stability. This foundational step ensures that the alternator will remain stable and functional during the operation of your vehicle.
The reassembly process involves precise steps to make sure that everything is put back correctly and your Mini Cooper runs smoothly.
- Secure the Alternator: First, carefully position the alternator back into its designated space within the engine bay. Use the appropriate bolts to secure the alternator firmly in place, ensuring it's stable and correctly aligned for best operation.
- Reconnect Wiring and Tensioner: Next, you'll need to reconnect the wiring harness and the tensioner. This step is important for restoring the electrical connections that power the alternator and for maintaining the correct tension on the belt. Make sure all connections are secure and correctly positioned to avoid any electrical issues or slippage during operation.
- Replace the Belt: Finally, replace the belt according to the correct specifications for your Mini Cooper. Verify the belt path around the alternator, AC pump, and crankshaft pulley to ensure proper alignment. Engage the roller mechanism and clip the pull cord to smoothly disengage for easy belt installation.
Following these steps will help you successfully reassemble your Mini Cooper's alternator, ensuring your vehicle runs efficiently and reliably.
Conclusion
Now that you've meticulously navigated through the complex process of removing the alternator from your Mini Cooper, you're on the brink of triumph. But don't let your guard down just yet.
The reassembly and installation await with their own set of challenges. Double-check every connection is secure, verify your work, and then the moment of truth – start your engine.
Will it purr back to life, rewarding your efforts, or will it demand a second look? Only your attention to detail will tell.
