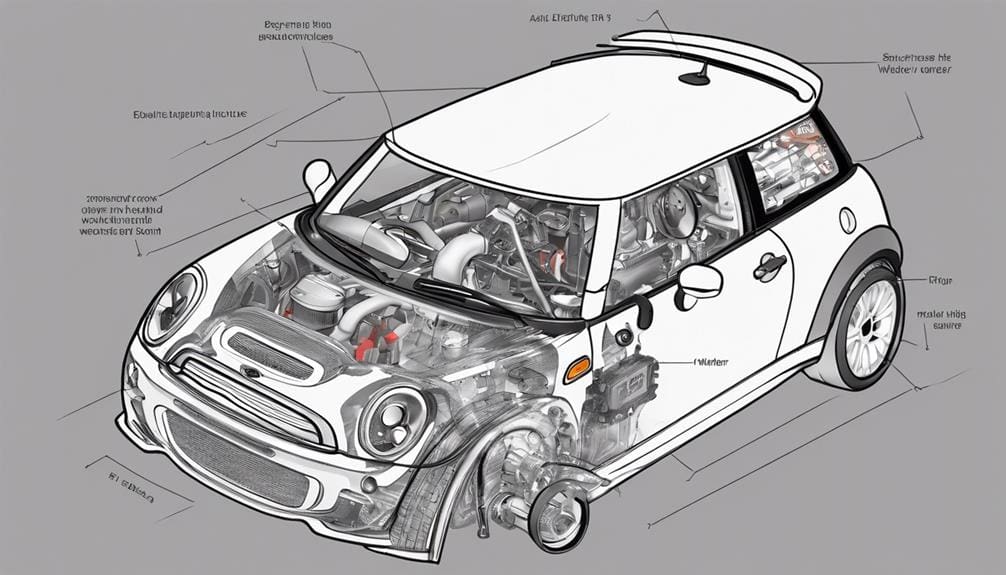
In your Mini Cooper S R53, you'll find the water pump at the front of the engine block. It's crucial for circulating coolant throughout the cooling system, preventing your engine from overheating by managing coolant flow based on engine speed. If you're facing issues like engine overheating, it might be time to check your water pump for potential failures. Replacing the water pump involves removing several engine components. It's driven by the supercharger and requires precise tool use and specific gear alignment. Remember, a critical O-ring needs maintenance with Vaseline for a tight seal. Discovering the steps involved can guarantee your Mini remains in peak condition.
Location and Function
The water pump on your Mini Cooper S R53, situated at the front of the engine block, plays an essential role in circulating coolant to maintain the engine's ideal operating temperatures. This component is directly driven by the engine's crankshaft, underscoring its importance in the vehicle's cooling system. Its primary function is to guarantee that coolant fluid continuously flows through the engine and radiator, facilitating heat dissipation and preventing the engine from overheating.
Understanding the location and function of the water pump is critical for diagnosing cooling system issues and performing maintenance. The pump's strategic placement at the engine's forefront allows it to effectively manage the coolant flow, directly influenced by the engine's operational speed. This design ensures that the cooling efficiency is aligned with the engine's heat generation, adapting to different driving conditions.
Being aware of the water pump's role and position enables you to recognize symptoms of potential failures, such as overheating or coolant leaks, which could indicate a malfunctioning pump. Regular checks and maintenance of the water pump are essential for sustaining your Mini Cooper S R53's performance and longevity, highlighting the significance of this component in the overall health of your vehicle.
R53 Water Pump Replacement
Understanding the location and function of your Mini Cooper S R53's water pump prepares you well for tackling its replacement, a task that requires removing several engine components for access. The water pump, essential for circulating coolant and maintaining the engine at its peak operating temperature, is driven by the supercharger at the front of the engine.
When you're set to undertake a water pump replacement, you'll need to navigate around the supercharger, intercooler, and inlet tube, removing these components to reach the pump. This process demands precision and the right tools.
| Tool | Purpose |
|---|---|
| 13mm Socket | For removing bolts |
| Pliers | For hose clamp removal |
| Vaseline | For O-ring lubrication |
Proper gear alignment and O-ring maintenance are critical steps in the installation process to avoid leaks and ensure the cooling system operates efficiently. Using Vaseline to lubricate the new O-ring before installation can prevent damage and ensure a tight seal, safeguarding the longevity of your Mini Cooper's engine by maintaining a reliable coolant flow. This meticulous approach guarantees your water pump replacement enhances your vehicle's performance and cooling efficiency.
Service Mode Activation
Before you can tackle the task of replacing the water pump on your Mini Cooper S R53, you'll need to activate service mode. This process requires a set of specific tools and some preparation, including the removal of the front bumper and draining the coolant system.
Activating service mode offers you the necessary access and space to efficiently work on the water pump, highlighting its importance in the repair process.
Entering Service Mode
To activate service mode on your Mini Cooper S R53, you'll first need to remove the front bumper and crash structure, ensuring access to the vehicle's critical components. This initial step is vital for gaining the necessary workspace.
Following this, carefully drain the radiator coolant to prevent any spills during the process.
The next step involves sliding the A/C condenser out of its usual position. You'll achieve this by disconnecting the A/C lines and removing the bolts that secure the condenser. This action is necessary for preventing any damage to the system while accessing the water pump.
Required Tools & Preparation
You'll often need a ratchet (3/8 preferred), a 6-10 inch extension (3/8), an 8mm socket (1/4 inch with a small extension), a 13mm socket (3/8), and a 10mm socket (3/8) to properly prepare for service mode activation on your Mini Cooper S R53. Activation of service mode is essential for accessing the water pump, as it involves removing the front bumper cover and crash structure. This process is not just about the water pump replacement but also about ensuring your Mini Cooper S R53 is prepared for the procedure.
| Tool | Size | Purpose |
|---|---|---|
| Ratchet | 3/8 preferred | General disassembly |
| Extension | 6-10 inch (3/8) | Accessing deep or tight spots |
| Socket | 8mm (1/4 inch) | Removing smaller bolts |
| Socket | 13mm & 10mm (3/8) | Disconnecting A/C condenser |
Draining the radiator coolant and sliding the A/C condenser out of place are critical steps that require precision and the right tools.
Service Mode Benefits
Activating service mode on your Mini Cooper S R53 greatly simplifies the process of accessing and replacing the water pump by removing obstructions such as the front bumper and crash structure. This essential step involves draining the radiator coolant and carefully moving the A/C condenser to prevent damage.
You'll also need to disconnect the A/C condenser and remove the radiator, cooling fan, and alternator to reach the water pump. Engaging service mode is vital for an efficient and effective water pump replacement, ensuring you have unobstructed access to perform the task at hand.
A/C Condenser Disconnection
Begin the disconnection process by removing the two 10mm bolts that secure the A/C lines to the condenser on your Mini Cooper S R53. This step is vital for gaining access to the water pump area, and it's important to handle these components with care to avoid damage. Once the bolts are removed, you'll need to slightly pull or twist the A/C lines to disconnect them. These lines are fitted with O-rings, which guarantee a tight seal, so be gentle to prevent any damage or leaks.
Next, you'll tackle the A/C condenser itself. This involves removing two 13mm bolts that hold the condenser in place. With these bolts out, you can then carefully release the condenser, providing the necessary clearance to the water pump area. During this process, it's also necessary to disconnect the fan electrical connector from the radiator. This step is essential for removing the condenser without causing any electrical issues.
Throughout this procedure, remember to maintain a systematic approach to prevent any accidental damage to the A/C components. Proper disconnection and handling of these parts are key to a successful operation, ensuring you can access the water pump area without complications.
Cooling System Overhaul
To overhaul the cooling system on your Mini Cooper S R53, it's essential to first understand that the water pump, a key component, is driven by the serpentine belt at the front of the engine block. This pump plays a pivotal role in circulating coolant through the engine, ensuring it maintains an ideal operating temperature. Without a properly functioning water pump, your engine is at risk of overheating, leading to significant damage.
Accessing the water pump for inspection or replacement requires you to remove various components, including the intercooler and supercharger inlet tube. It's a process that demands careful attention to detail. Regular maintenance of the water pump and the entire cooling system can't be overstated in its importance. Overlooking routine checks and replacements can lead to inefficient cooling, overheating, and ultimately, engine failure.
Proper installation of the water pump is essential for the health of your Mini Cooper's engine. It ensures the cooling system operates efficiently, safeguarding the engine against overheating and promoting longevity. An overhaul of the cooling system, thus, not only involves replacing the water pump but also inspecting and possibly updating surrounding parts to maintain ideal cooling performance.
Belt and Intercooler Removal
Before you can access the water pump on your Mini Cooper S R53, you'll need to remove the serpentine belt and the intercooler.
Start by locating the tensioner to rotate and slacken the belt, allowing you to slide it off with ease.
Next, you must detach the intercooler by disconnecting its hoses and unbolting it, which prepares the area for water pump access.
Removing Serpentine Belt
Kicking off the removal of the serpentine belt on your Mini Cooper S R53 requires first taking out the intercooler by loosening specific Torx bolts and carefully sliding it out of position.
The intercooler removal is an important step, utilizing T30 Torx bolts to free it from its mount. Once you've managed this, you're one step closer to accessing the serpentine belt.
The belt itself is essential for driving engine accessories, and its removal isn't as intimidating as it might seem. You'll need to locate the tensioner's square slot, then use a suitable tool to rotate it. This action releases the tension, allowing you to slip the belt off with ease.
Properly executing these steps ensures a smooth process for maintenance or replacement tasks on your vehicle.
Intercooler Detachment Steps
After removing the serpentine belt from your Mini Cooper S R53, you'll need to detach the intercooler by unscrewing four T30 Torx bolts from the black plastic diverter. This step is important for accessing the components beneath.
Next, you'll tackle the intercooler itself, secured by eight T30 Torx bolts. Carefully unscrew these to free the intercooler. To remove it, gently slide the intercooler to the left and lift the right side up. This maneuver requires attention to avoid damaging any adjacent parts.
During this process, it's essential to note the position of clamps and screw locations for a hassle-free reassembly. Also, inspect the rubber sleeves for wear or damage. These sleeves are crucial for a secure fit and efficient performance of the intercooler, ensuring your Mini Cooper S R53 runs smoothly.
Preparing for Pump Access
To access your Mini Cooper S R53's water pump, you'll first need to remove the drive belt by engaging the tensioner's square slot to create slack. This initial step is important for the subsequent removal processes:
- Intercooler Removal: Explore the heart of your Mini by removing the intercooler. Detach the four T30 Torx bolts from the black plastic diverter and the eight securing the intercooler. This step isn't just about making space; it's about preparing to confront the core of your cooling system with precision.
- Throttle Body Disconnect: Loosen the clamp and the four throttle body bolts. Disconnecting the electrical connector and vacuum line isn't just a procedure; it's a step towards ensuring your engine's heart beats without overheating.
- Emotional Resonance: Each turn of the wrench brings you closer to safeguarding your Mini's performance, ensuring every drive is as exhilarating as intended.
Alternator and Throttle Body
When addressing maintenance on your Mini Cooper S R53, it's vital to understand that the alternator is mounted near the upper strut mount, secured by three bolts, while the throttle body, requiring a 10mm socket for the four securing bolts, must have its electrical connector and vacuum line disconnected before removal. This process is essential for reaching deeper into the engine bay, particularly when aiming for components like the water pump and its O-ring, which are integral to the vehicle's cooling system.
Disconnecting the electrical connectors from the alternator may not be mandatory, but it's advisable for easier handling and to prevent any potential damage. This step ensures that you have better access and visibility when working in the tight spaces of your Mini Cooper's engine bay.
Removing the throttle body not only grants you access to other components such as the intercooler but also to the water pump. This is a critical step in the maintenance process, allowing for a thorough inspection or replacement of the water pump O-ring, ensuring your Mini Cooper S R53 runs smoothly and efficiently. Remember, attention to detail and following these steps carefully will save you time and prevent issues down the line.
Water Pump Removal Steps
Having removed the throttle body for better engine bay access, you'll next focus on detaching the water pump, situated at the engine block's front. Here's a technical guide to skillfully navigate this phase:
- Disconnecting Hoses: Begin by disconnecting the hoses attached to the water pump. If they're stubborn and refuse to budge, gently twist them free with pliers. This guarantees you avoid damaging the hose or the pump's surface.
- Removing the Supercharger Inlet Tube: To gain clear access to the water pump, removal of the supercharger inlet tube is necessary. This step requires careful maneuvering to avoid any damage to surrounding components.
- Unbolting the Water Pump: With the hoses and supercharger inlet tube out of the way, you're ready to unbolt the water pump from the engine block. Make sure all connections are fully detached before attempting to pull the pump away.
This process might evoke a mix of anticipation and anxiety, knowing the critical role the water pump plays in your Mini Cooper S R53's cooling system. However, armed with this detailed guide, you're well-equipped to tackle the task with confidence.
Installation and Final Checks
After successfully removing the old water pump, you'll need to align the new pump's gears with the supercharger meticulously to guarantee smooth operation. This step is important because the water pump and supercharger must work in harmony to make sure your Mini Cooper S R53's engine stays cool under all conditions. Start by positioning the water pump near the front of the engine, making sure the gears mesh perfectly with those of the supercharger without forcing them.
Once the water pump is in place, secure it with the bolts provided, following the manufacturer's recommended torque specifications to prevent any potential leaks or damage. Next, reattach all hoses and connections you removed during the disassembly process. Pay special attention to the seals and gaskets, replacing any that show signs of wear or damage to ensure a tight, leak-free installation.
Before declaring the installation complete, you must perform a series of final checks. First, refill the cooling system with the appropriate coolant, adhering to recommended levels. Then, bleed the system of any air to prevent hot spots or overheating. Finally, start the engine and monitor the coolant levels and system pressure closely to ensure everything is functioning as it should. Keep an eye out for any leaks or unusual noises which could indicate a problem with the installation.
Conclusion
In your journey through the mechanical heart of your Mini Cooper S R53, you've navigated the labyrinth of its engine bay, danced with the intricacies of its cooling system, and wrestled with the sinews that power its spirited drive.
Replacing the water pump isn't just a repair; it's a rite of passage. With each bolt turned and hose reconnected, you breathe new life into your Mini, ensuring it continues to pulse with the vigor of a well-oiled symphony.
Rest assured, your diligence and precision have fortified your Mini's heart against the trials of the road ahead.
